
From the Appointments for Assets page, you can manage your appointments with the fleet maintenance shop. Managing appointments include the following:
Note: In the Available Actions menu, the Appointment link is available only if you have Customer Appointment View permission.
The Create Appointment dialog box lets you create an appointment in a specific maintenance shop to perform repairs/service on your asset.
Create appointment
1. In the Customer Portal screen, enter the asset number or the license plate number, and then click the Continue button.
The asset information page opens.
2. In the Available Actions section, click Appointment.
The Appointments page opens. The Appointments page displays the existing appointments for the asset.
3. Click the Create Appointment link.
The Create Appointment dialog box opens.
4. In the Shop list, select the maintenance shop to create an appointment.
Note: The Shop list displays the maintenance shops that are assigned to your user account in the Setup module of FASTER Web.
5. In the Appointment Status list, select the Waiting for Fleet to confirm status.
6. In the Appointment Date/Time field, type the date and time in the MM/DD/YYYY HH:MM:SS AM/PM format.
|
Note:
The Select Customer Appointment Date/Time dialog box opens displaying the available time slots for the current date. You can click the navigation arrows (
You can clear the Send Notification on Save check box if you do not want to send appointment notification to any of the above contacts. · If the Auto Approve Appointment is configured for selected maintenance shop, the Confirmed option is selected for Appointment status drop-down and is disabled. · If the Auto-approve appointment is not configured, Appointment status drop-down is enabled, and user can select appropriate status. · The FASTER Web system restricts a user from creating an appointment for unavailable time range of the maintenance shop. In Calendar, when maintenance shop administrator tries to book the appointment, date time range in the ‘select Customer Appointment Date/Time’ pop-up is disabled. · When user clicks on the save button in the appointment pop-up, the system checks whether appointment Date/Time is overlapping the maintenance shop unavailability or not. If yes, the system displays the following error message "Customer Appointments cannot be made because the maintenance shop is unavailable for the selected date/time. Please select different date/time." |
7. Do one of the following:
§ Click Save to save the information and close the window.
§ Click Save and Add Service Request to submit the appointment and to go to the Service Request page.
§ Click Cancel to disregard any changes and close the window.
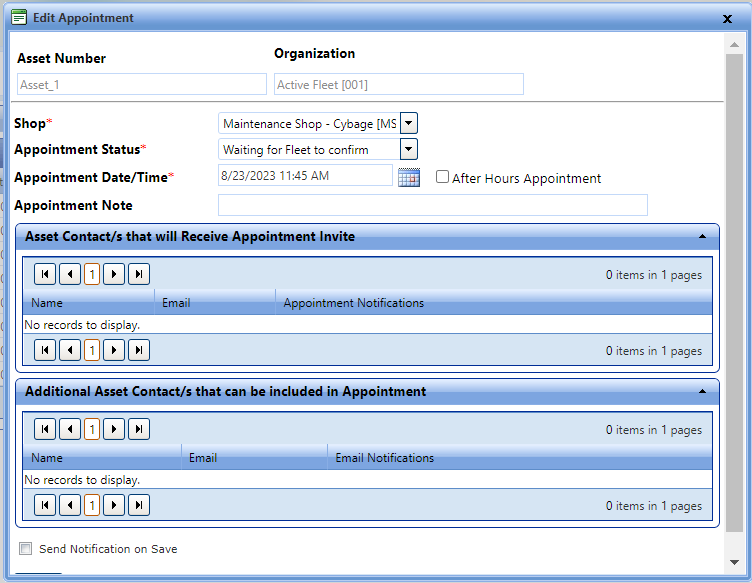
The Edit Appointment dialog box lets you modify or update the details of the appointment. Once the appointment is modified or updated, an email notification is sent to the asset contacts.
Edit appointment
1. In the Customer Portal screen, enter the asset number or the license plate number, and then click the Continue button.
The asset information page opens.
2. In the Available Actions section, click Appointment.
The Appointments page opens. The Appointments page displays the existing appointments for the asset.
3. Click the Edit link next to the appointment that you want to edit.
The Edit Appointment dialog box opens.
4. Make the changes as required.
|
Note:
|
5. Click one of the following:
§ Click Save to save the information and close the window.
§ Click Save and Add Service Request to submit the appointment and to go to the Service Request page.
§ Click Cancel to disregard any changes and close the window.
When a FASTER Web user creates an appointment or proposes a different date/ time for your appointment, you can confirm the appointment if the appointment schedule is feasible to you.
1. In the Customer Portal screen, enter the asset number or the license plate number, and then click the Continue button.
The asset information page opens.
2. In the Available Actions section, click Appointment.
The Appointments page opens. The Appointments page displays the existing appointments for the asset.
3. Click the Confirm link next to the appointment that you want to confirm.
The appointment is confirmed and a notification email is sent to the asset contacts.
Note: The Confirm link is available only when the FASTER Web user has created an appointment or proposed a changed schedule for appointment.
4. Click one of the following:
 ) to move back and forth on the calendar and click