Tip
TipAlerts are an alphanumeric value to identify the problems in an asset. The Alerts section lets you search the alerts that are imported for the FASTER assets, and also create pending repairs for those alerts.
Tip
To view the Alerts page, click the Alerts link.
1. Click the Maintenance module.
2. In the Actions section, click Service Requests & Alerts.
The Service Requests page opens.
3. In the Alerts section, perform the following:
o In the Alert box, type the alphanumeric value of the alert.
o In the Asset Number box, type the asset number.
o In the Description box, type a brief description about the alert.
o To display alerts that do not require a repair or service activity but are added to the Alerts Tab for history purpose, select the Alerts on Asset for history check box.
o To display alerts against which an action is yet to be taken, select the Alerts with no action check box.
o To display alerts that are converted to pending repairs, select the Pending Repair check box.
o To display alerts that are added as service items, select the Service Item check box.
o To display all the alerts, select / clear all the check boxes.
o Optionally, if you know the exact asset number or alert number, select the Exact Match check box to exactly match the search result with the search parameters.
4. Click Search.
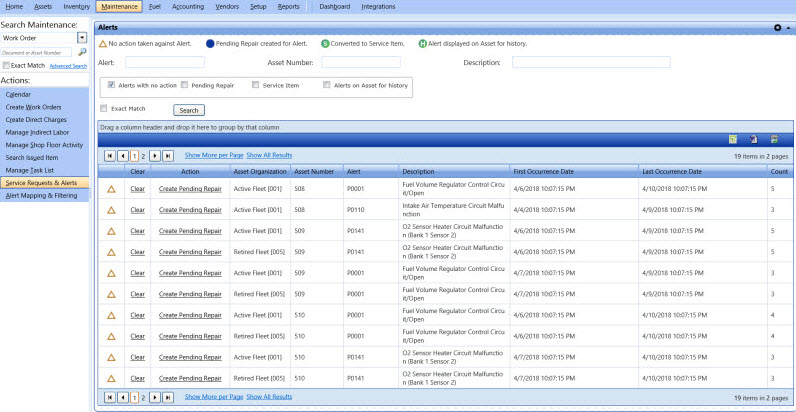
The Search Results grid displays the alerts based on the search parameter with the following information for each alert:
o Clear
o Action
o Asset Number
o Alert
o Description
o First Occurrence Date
o Last Occurrence Date
o Count
|
Note: · Click the Clear link to remove the alert of an asset. · Click the Create Pending Repair to create a repair for the asset. |
You can export the Search Results grid in the following formats:
· Microsoft Excel (.xlsx)
· Microsoft Word (.docx)
· Comma-Separated Values (.csv)
1. Click the Microsoft Excel ( ![]() ), Microsoft Word (
), Microsoft Word (  ), or Comma-Separate Value (
  ) icon in the upper-right corner of the Search Results grid.
The File Download dialog box opens prompting you to Open, Save, or Cancel.
2. Click Save.
The Save As dialog box is displayed with the File Type of the selected format.
3. Browse to the desired location, specify a file name, and then click Save.
The Search Results grid is saved in the specified format at the specified location.