Tip
TipThe Manually Added tab lets you add alert codes in FASTER Web and create alert code mappings with repair codes. You can also update or delete the existing alert code mappings available in the Manually Added tab. FASTER Web considers the alert code mappings created in the Manually Added tab on priority and converts these alert code mappings to pending repairs and service items as applicable before converting the alert code mapping created in the SAE Alerts Tab, Manufacturer/ Other Sources Tab and Previously Imported Tab.
Tip
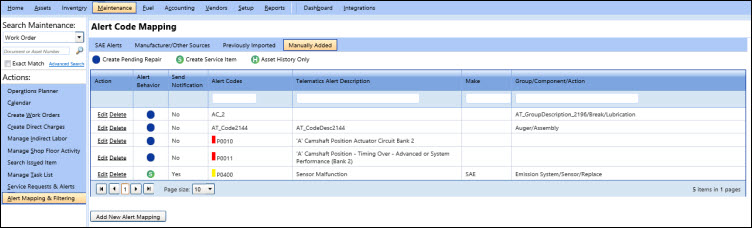
To view the Manually Added tab, click the Manually Added link.
After you add alert codes in FASTER Web and create alert code mappings with repair codes, the Manually Added grid displays the following:
Action: The Action column displays the Edit and the Delete options to modify or remove the alert, respectively.
To edit the alert code mapping, click the Edit link, and then make the required changes in the Map Group/Component/Action and Set Behavior dialog box.
To delete the alert code mapping, click the Delete link, and then select Yes in the Delete Alert Code and Mapping dialog box.
Alert Behavior: The Alert behavior column displays the way the alert is treated when it is imported to FASTER Web.
The ![]() icon indicates that the alert is automatically converted to Pending Repairs.
icon indicates that the alert is automatically converted to Pending Repairs.
The ![]() icon indicates that the alert is added as a Service Item.
icon indicates that the alert is added as a Service Item.
The ![]() icon indicates that the alert does not require a repair or service activity but is added to the Alerts Tab for maintaining history.
icon indicates that the alert does not require a repair or service activity but is added to the Alerts Tab for maintaining history.
Send Notification: Displays Yes or No depending on the Send Notification setting configured while mapping alert codes with the repair code.
Alert Codes: Displays the alert codes along with the urgency/priority of the alert.
Telematics Alert Description: Displays the description of the alert.
Make: Displays the manufacturer name of the asset.
Group/Component/Action: Displays the repair code (group, component, and action) of the alert.
The Map Group/Component/Action and Set Behavior dialog box lets you create a new alert code mapping in FASTER Web.
Tip
To view the Map Group/Component/Action and Set Behavior dialog box, click the Map Group/Component/Action and Set Behavior link.
1. Click the Maintenance module.
2. In the Actions section, click Alert Mapping & Filtering.
The Alert Code Mapping page opens.
3. Click the Manually Added tab, and then click Add New Alert Mapping.
The Map Group/Component/Action and Set Behavior dialog box
4. In the Alert Code box, type the alert code.
|
Note: In the Map Group/Component/Action and Set Behavior dialog box, enter the following optional fields: · In the Telematics Alert Description box, type a description about the alert. · In the Make list, select a manufacturer name if the alert is specific to a manufacturer. In the SAE Alerts Tab, Manufacturer/ Other Sources Tab and Previously Imported Tab, since the alert codes already exist in FASTER Web, the alerts that are specific to a manufacturer has the Make information associated with the alert code. Therefore, you can select the asset Make only in the Manually Added tab. · The Repair Reason, Repair Schedule, and Is Billable? fields display the default repair reason, schedule, and billing settings defined in the Setup module. You can modify the default Repair Reason from Setup > Application Setup > Maintenance > Settings > Alert Mapping Settings section, and the association of Repair Schedule, and Is Billable? information from Setup > Application Setup > Maintenance > Settings > Repair Codes > Repair Reason section. |
5. In the Set Behavior for Alert section, set the behavior of alerts to one of the following:
§ Automatically create Pending Repair when Alert is imported: Automatically converts the imported alerts to Pending Repairs. These alerts are displayed with the ![]() icon in the Alert Behavior column of the Manually Added tab, and in the Alerts section of the Service Requests & Alerts tab.
icon in the Alert Behavior column of the Manually Added tab, and in the Alerts section of the Service Requests & Alerts tab.
§ Add Alert as Service Item when Alert is imported: This option automatically adds the imported alerts as service items. These alerts are displayed with the ![]() icon in the Alert Behavior column of the Manually Added tab, and in the Alerts section of the Service Requests & Alerts tab.
icon in the Alert Behavior column of the Manually Added tab, and in the Alerts section of the Service Requests & Alerts tab.
§ Add Alert to Asset History Only: This option only adds the imported alerts to the Alerts Tab of the respective asset and does not convert them to pending repairs or service item. These are alerts that do not require a repair or service activity but are added to the Alerts Tab for maintaining history. These alerts are displayed with the ![]() icon in the Alert Behavior column of the Manually Added tab, and in the Alerts section of the Service Requests & Alerts tab.
icon in the Alert Behavior column of the Manually Added tab, and in the Alerts section of the Service Requests & Alerts tab.
6. In the Service Urgency list, set the urgency of the alert to one of the following:
Note: The Service Urgency list is displayed only if you select Add Alert as Service Item when Alert is imported.
§ Do Not Drive: Indicates that the alert is critical, and the asset can be used only after repair is performed on it. The color code for Do Not Drive is red ![]() .
.
§ Service ASAP: Indicates that the alert is critical, but these alerts can be fixed after the repairs are performed on the Do Not Drive alerts. The color code for Service ASAP is yellow ![]() .
.
§ Service in Future: These alerts are not critical and can be serviced in future. The Service in future option does not have a color code.
7. In the Repair Priority list, select the priority of the repair.
Note: The Repair Priority list is displayed only if you select Automatically create Pending Repair when Alert is imported.
8. In the Map Group/Component/Action for Alert section, do the following to map the alert code with the repair code:
Click the Group box, and select a group from the list.
Click the Component box, and select a component from the list.
Click the Action box, and select an action from the list.
|
Note: · To clear the group, component, and action selection, click Clear filters. · To send alert notifications via email and text messages to the asset contacts, Select the Send Notification check box. When you select the Send Notification check box, you can do the following: § Select the Add additional message to this notification check box to add an additional message to the notification. § Click Configure Message to open the Configure Message editor where you can type the additional message and save it. · Text messages are sent only if the text messaging option is enabled in the Setup > Application Setup > Maintenance > Maintenance Settings > Maintenance/ TWS Settings. |
9. Click one of the following: